Monday, July 26, 2010

Poh's Orange Chiffon Cake

Last night, like so many thousands of people around the nation, a group of us gathered to warm our hands at the digital fireplace and share a moment in history. In short, MASTERCHEF FINALE ZOMG YAY FOR ADAM.

To mark the occasion, I made an orange chiffon cake from a recipe by last year's runner-up and my current favourite tv cook, Poh Ling Yeow. While in her version she finishes it with cream and whatnot, I kept it simple - chiffon cakes are really just perfect on their own.

For more chiffon cake goodness, try Azuma Patisserie in Sydney CBD which has a constant array of the most gorgeous, pillowy cakes in flavours including earl grey, green tea, and chocolate. Their cakes are of a massive height too, at least twice as tall as the one I achieved!


Poh's Orange Chiffon Cake


Orange Chiffon Cake

Poh's recipe very specifically states that you need to use a NON non-stick tin, so that when you invert the cake after baking the cake will hold its shape until it's cool. I found it impossible to locate a sticky tin easily, so I just went ahead and used a non-stick tin anyway, and guess what, it stuck perfectly! In fact it stuck so well that I lost some of the top when I was decanting it. Oops.


5 egg whites (at room temperature is best)
1/2 tsp cream of tartar
75g caster sugar
5 egg yolks
7 tbs coconut milk
5 tbs vegetable oil
75g caster sugar
5 tbs orange juice
1 tbs orange zest
150g self raising flour, sifted


Preheat oven at 160°C fan forced/180°C regular.

Beat egg whites and cream of tartar with an electric mixer till soft peaks. Add sugar one tablespoon at a time a beat thoroughly after each addition till you achieve stiff peaks. Set aside.

In a separate bowl whisk egg yolks with caster sugar till fluffy. Add coconut milk, vegetable oil, orange juice, zest and self raising flour and whisk until combined. Gently fold the egg whites together with the yolk mixture in three batches.

Pour into a 22cm baba cake tin or angel cake tin. I used an angel cake tin with a removable base. Do not grease the tin.

Bake 25 mins at 160°C fan forced or 30 mins at 180°C, or till skewer comes out clean. Leave oven on to roast hazelnuts.

When the cake is out of the oven, immediately invert the cake still in the tin. Place on a cooling rack and leave to cool completely (about 2 hours).


From Poh's Kitchen

Poh's Orange Chiffon Cake

Monday, July 19, 2010

Chocolate Meringues

Despite the Zuger Kirschtorte, I STILL had some egg whites to dispose of - hence, meringues. With only three ingredients, this was the quickest and easiest way to get rid of the remaining whites.

This recipe uses the 'Swiss method' and is taken from the Bourke Street Bakery cookbook.

Chocolate meringues

Chocolate meringues

The proportion is 1 part eggs to 2 parts sugar. I actually used 170g egg white to a whopping 340g sugar, but the purposes of this recipe I've kept BSB's measurements.

105g egg whites (about 3)
210g caster sugar
70g unsweetened cocoa powder, sifted into a bowl


Preheat oven to 130C.

Stir egg white and sugar in a very clean stainless steel bowl. Place the bowl over a saucepan of boiling water and stir continually, scraping down the sides with a rubber spatula.

When the liquid is smooth and clear, remove from heat. Wipe the bottom of the bowl to prevent water from contacting the mix.

Whisk the warm liquid in a stand mixer or with a hand mixer until it's cool and firm peaks form. This will take about 10 minutes. My mix looked very white and very sticky.

Using a large spoon, scoop up a meringue and drop it into the cocoa powder. BSB suggests swirling the bowl so it's completely coated. This sounds so easy! Needless to say I made a mess.

Place meringues on a tray lined with baking paper. Using the tips of your fingers, 'drag' the meringue upwards a little to streak the chocolate and create a peak. Or try, anyway.

Turn the oven to 100C and bake meringues for approximately 90 minutes or until they're crisp outside and soft in the centre. (BSB suggests if you want them crispy all the way through, you can bake them for up to 6 hours!)

BSB's proportions make 12-18 small meringues or 4-6 large ones. Starting with more mixture, I made 20 medium sized ones, just to be different.

Uniformity not being one of my strong points, my meringues all turned out so different-looking!

This one reminded me of a poached egg:

Chocolate meringue

This one was a bit like larvae from Alien:

Chocolate meringue

And I don't know, some kind of cloud formation? Or something.

Chocolate meringue


Adapted from 'Bourke Street Bakery' by Paul Allam and David McGuinness

Sunday, July 18, 2010

Zuger Kirschtorte

After last week's Crack Pie extravanganza, I found myself with eight egg whites to dispose of. What to do, what to do? Pavlova, meringues, macarons?

A Swiss friend from work suggested this classic Swiss torte - it's basically a genoise sponge, sandwiched between two meringues and flavoured with kirsch (cherry liqueur).

I've known for a long time that presentation is my weak flank but it's particularly obvious when the original looks as gorgeous as it does. I tried! I really tried! But it wasn't to be. I NEED TO WORK ON THIS.

Otherwise, I think it was a success. It's a reasonably light cake, with just enough sweetness in the cream and flavour from the kirsch. The texture of the meringues was great, quite soft and chewy - it reminded me very much of the base of a particular variety of chocolate cream and sponge cake you can get in Chinatown bakeries. And that was a long sentence leading nowhere in particular.

We ate this while watching Master Chef - Iron Chef Sakai was guest judge! - and drinking tea. Nice.


Zuger Kirschtorte

Zuger Kirschtorte

This cake will require a long run-up time because of the meringues - you need to allow at least 4 hours for them to cool in your oven, and during this time of course you can't really start on the genoise sponge cake. I ended up making this over two days: I baked the meringues and genoise cake on day 1, sealed them in an airtight container overnight, then did the cream, syrup, and assembly on day 2.


ALMOND MERINGUE
4 egg whites
120g confectioners' sugar
20g corn starch
100g almond meal/ground almonds

Preheat the oven to 160ºC/320ºF. Draw two 25cm (10in) circles in a large piece of parchment/baking paper, on a baking sheet. Generously butter the insides of each circle.

Sift the confectioners' sugar in a small bowl, add the corn starch and almond meal; set aside.

Beat the egg whites until stiff; remove the bowl from the mixer and, using a rubber spatula, delicately fold the reserved ingredients into the egg whites.

Spread the mixture inside the circles, leaving 0.5cm of the edges free of meringue – it will spread.

Bake for 40-50 minutes, or until the meringue is golden. Turn off the oven and allow meringue to cool inside, for at least 4 hours (can be made overnight).


GENOISE
3 eggs, egg whites and yolks separated
3 tablespoons hot water
80g confectioners' sugar, sifted
10g caster sugar
50g all purpose flour
50g corn starch
pinch of baking powder


Preheat the oven to 175ºC/350ºF; butter a 25cm (10in) springform round cake pan (I used one with a removable bottom), line the bottom with baking paper and butter the paper as well.

Using a mixer, beat the egg yolks with the water until thick and light. Add the confectioners’ sugar gradually and beat well. Set aside. (I beat the yolks by hand, due to a shortage of bowls/equipment, and saved the stand mixer for the egg whites which are so much harder to beat.)

Beat the egg whites until stiff; add the caster sugar and beat well. Remove the bowl from the mixer and add the yolk cream to the egg whites. Sift the flour, corn starch and baking powder over the mixture and fold in carefully with a rubber spatula.

Pour the batter into the prepared pan and bake for 25-30 minutes or until cooked through – the cake will pull apart from the sides of the pan when baked. Transfer the pan to a wire rack and let cool completely.


BUTTERCREAM
150g unsalted butter, room temperature
150g confectioners' sugar, sifted
1 egg yolk
50g currant jam – I used black cherry jam which gave the cream quite a rich colour

Beat the butter until light and creamy. Add the confectioners’ sugar gradually, beating well. Add the egg yolk and jam, beat well until smooth.


SYRUP
4 tablespoons water
20g caster sugar
120ml kirsch - this can be hard to obtain, you may have to look around at a few liquor stores. It's also VERY strong, so I ended up halving this part of the recipe.

In a small saucepan, combine water and sugar over medium-high heat until it starts boiling. Remove from the heat and set aside to cool. Add the kirsch and mix well. Set aside.


TOPPING
100g almonds, toasted and chopped
70g confectioners' sugar


ASSEMBLY

Very carefully, peel the meringue disks off the baking paper and place one of them on a serving plate. Spread 1/3 of the buttercream over the meringue. Place the cake on top of it and brush it generously with the syrup. (As above - I didn't use all the syrup because kirsch is so strong in taste.)

Carefully spread 1/3 of the buttercream over the cake. Cover with the other meringue disk. (As I found it hard to spread the cream without damaging the cake, I spread the cream on the bottom of the top meringue disk and then put that on top.)

Spread the remaining buttercream on the sides of the cake and "stick" the chopped almonds on the cream. (This is hard! VERY VERY HARD. I have no advice except perhaps don't chop the almonds too finely.)

Using a sieve, sprinkle the top of the cake with the confectioners' sugar. Draw a criss-cross pattern on the sugar using the back of a knife.

Keep it refrigerated, but serve it at room temperature – the cake gets hard in the fridge.


From Technicolor Kitchen

Zuger Kirschtorte

Monday, July 12, 2010

Momofuku Crack Pie

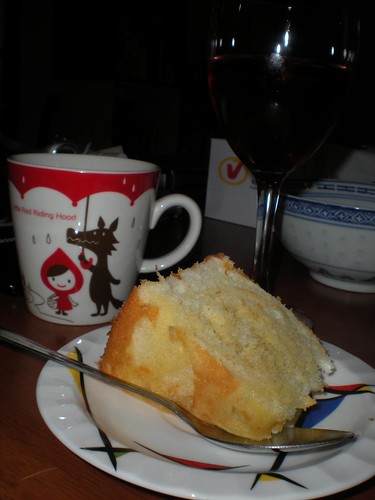
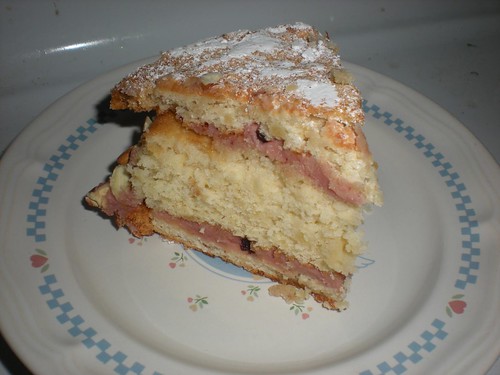
Midway through my first slice, I said, "It's nice, but is it really all it's cracked up to be?" Then, when I realised what I'd actually said, "oh, shi-"

"Are you gonna put that on your blog?" Robert said.

So.

I made this on request for Michelle, who saw the recipe on Almost Bourdain. The 'crack pie' - so-called because it's just as addictive - by NYC's Momofuku Milk Bar is apparently a sensation, and according to their website sells for US $44 per pie or US $5.25 per slice. Which sounds HUGE until you think about it, because that's really just a little more than the price of a nice cake at David Jones Food Hall, isn't it?

It was fun to make, and fun to eat, and even if it wasn't quite crack we still finished it all off in one sitting. But since thinking about the amount of butter that went into it is making me feel a bit ill (it could totally be reduced, I think), I am never going to make it again. <-- I reserve the right to renege this if you want to shell out $44.

 Momofuku Crack Pie

Momofuku Milk Bar's Crack Pie

Servings: Makes 2 pies (6 to 8 servings each)


COOKIE FOR CRUST

2/3 cup plus 1 tablespoon (3 ounces) flour
Scant 1/8 teaspoon baking powder
Scant 1/8 teaspoon baking soda
1/4 teaspoon salt
1/2 cup (1 stick = 113 g) softened butter
1/3 cup (2 1/2 ounces) light brown sugar
3 tablespoons (1 1/4 ounces) sugar
1 egg
Scant 1 cup (3 1/2 ounces) rolled oats


Heat the oven to 375 F (190 C) degrees.

In a medium bowl, sift together the flour, baking powder, baking soda and salt.

In the bowl of a stand mixer using the paddle attachment, or in a large bowl using an electric mixer, beat the butter, brown sugar and sugar until light and fluffy.

Whisk the egg into the butter mixture until fully incorporated.

With the mixer running, beat in the flour mixture, a little at a time, until fully combined. Stir in the oats until incorporated.

Spread the mixture onto a baking sheet and bake until golden brown and set, about 20 minutes.

Remove from heat and cool to the touch on a rack. Crumble the cooled cookie to use in the crust.

Though called a cookie, the texture of mine was more like a muffin.


CRUST

Crumbled cookie for crust
1/4 cup (1/2 stick = 56 g) butter
1 1/2 tablespoons (3/4 ounce) brown sugar
1/8 teaspoon salt

Combine the crumbled cookie, butter, brown sugar and salt in a food processor and pulse until evenly combined and blended (a little of the mixture clumped between your fingers should hold together).

Or, if you're like me, combine by hand. Use your fingertips rather than palms to avoid melting the butter too much.

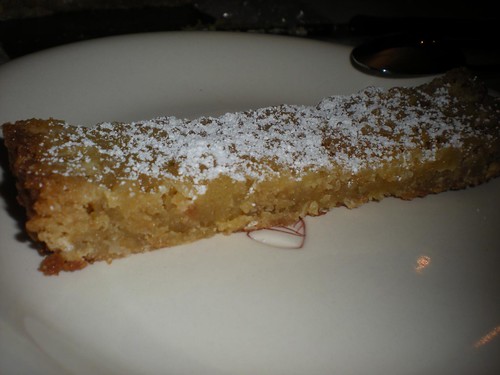
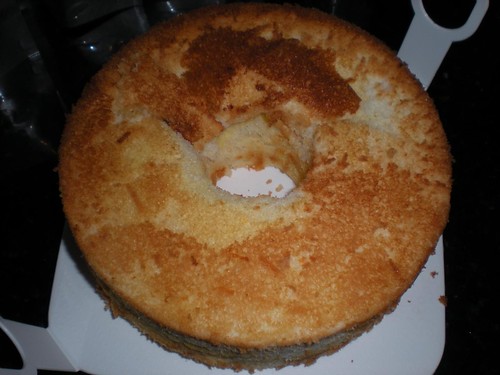
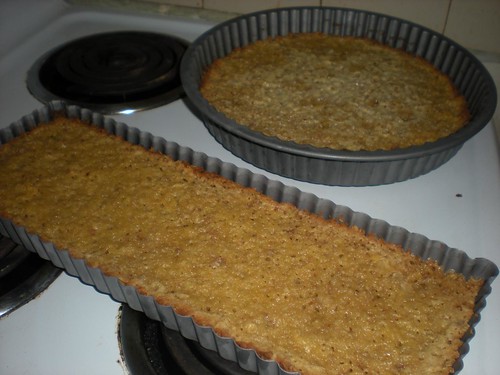
Divide the crust between 2 (10-inch) pie tins. Like Almost Bourdain, I used one round tart pan and one rectangular tart pan.

Press the crust into each shell to form a thin, even layer along the bottom and sides of the tins.

Set the prepared crusts aside while you prepare the filling.


FILLING

1 1/2 cups (10 1/2 ounces) sugar
3/4 cup plus a scant 3 tablespoons (7 ounces) light brown sugar
1/4 teaspoon salt
1/3 cup plus 1 teaspoon (3/4 ounce) milk powder*
1 cup (2 sticks = 226g) butter, melted
3/4 cup plus a scant 2 tablespoons heavy cream
1 teaspoon vanilla extract
8 egg yolks
2 prepared crusts
Powdered sugar, garnish


* Milk powder, you may or may not be surprised to find, is not sold in your local Coles in packets of less than 1kg. Since I didn't anticipate needing to use milk powder again in the near future, I skipped this ingredient. Reasoning that it was included for texture more than flavour, I subbed in a tablespoon of corn starch. Did I do wrong? Is this why I found the pie merely nice, instead of crack-like in addictive quality? You tell me.


Heat the oven to 350 F (176 C).

In a large bowl, whisk together the sugar, brown sugar, salt and milk powder. Whisk in the melted butter, then whisk in the heavy cream and vanilla.

Gently whisk in the egg yolks, being careful not to add too much air.

Divide the filling evenly between the 2 prepared pie shells. My filling had a texture like pureed fruit and was very easy to spread into the shells with a spatula.

Bake the pies, one at a time, for 15 minutes, then reduce the heat to 325 F (162 C) and bake until the filling is slightly jiggly and golden brown (similar to a pecan pie), about 10 minutes.

Remove the pies and cool on a rack.

Refrigerate the cooled pies until well chilled. The pies are meant to be served cold, and the filling will be gooey. Dust with powdered sugar before serving.


From Almost Bourdain

Momofuku Crack Pie

Monday, July 5, 2010

Nanaimo Bars aka Caramel Slice

Last Thursday was Canada Day - one of my friends organised a surprise party on the Saturday for her Canadian husband, and we all celebrated by bringing along and then consuming vast quantities of food. There was a moose-mousse cake, maple bacon cookies, Canadian Dry ginger ale, turkey sandwiches, salmon bagels, pumpkin pie, and so much more.

My contribution was the Nanaimo Bar. Allegedly a Canadian specialty, I suspect it is nothing more or less than a good old Ausssie caramel slice!

Nanaimo Bars

The traditional recipe calls for Graham Wafers which are not sold in Australia or most places outside North America. The original recipe has instructions on making these from scratch. Being too lazy to do the same, I followed the lead of cooks around the world and used a local substitute, which I crushed to crumbs in a sealed plastic bag with a rolling pin.

Digestive biscuits of any kind are fine; I used Arnotts Granita, which has a marginally lower sugar content and a rougher texture than similar biscuits like the Milk Arrowroot. Some blogs have also suggested it's possible to use half tea sweet biscuit or digestive, and half a salty biscuit or even pretzels - given how strong and sweet the caramel layer is, I think a half salty mix would work really well.


Base:
115gram unsalted butter
50gram granulated sugar
75ml unsweetened cocoa
1 large egg, beaten
200gram Graham Wafer crumbs (see above)
1/2 cup almonds (any type, finely chopped)
1 cup dessicated coconut

Caramel:
2 cans condensed milk (about 800 ml)
30 gram unsalted butter
3 tbsp golden syrup

Topping:
150 gram semi-sweet chocolate (I used 85% Lindt and it was awesome)
2 tablespoons unsalted butter


BASE: Preheat oven to 180 degrees Celsius (160 degrees Celsius fan-forced). Melt unsalted butter, sugar and cocoa in top of a double boiler. Add egg and stir to cook and thicken. Remove from heat. Stir in crumbs, nuts and coconut. Press firmly into an ungreased 8 by 8 inch pan. Bake for 10-12 minutes or until lightly browned and slightly risen. Remove it from oven and let it cool.


CARAMEL: Place butter and golden syrup in a medium saucepan over medium heat, stirring occasionally. When butter has melted, add condensed milk. Stir constantly over medium heat for about 9-12 minutes, until caramel thickens. Gently spread caramel evenly over base. Return to oven for a further 10-12 minutes (a 1/2cm border of lightly browned caramel should form around the edges of the slice).

This was the absolute messiest step by far - condensed milk is NOT a nice texture to work with and the whole kitchen was just sticky and sickly-sweet smelling, ugh. Also, I tried to be smart and used maple syrup instead of golden syrup. This turned out to be a fail because the maple crystallised instead of blending! I had to sieve the hard bits out before I could pour the caramel on to the base, which of course didn't help with the messiness...


TOPPING: Melt chocolate and unsalted butter over low heat. Cool. Once cool, pour over middle layer and chill.

Consider scoring the chocolate when it's semi-solid to enable easier cutting later. I didn't, and mine cracked all over the place!

Use a hot, dry knife to cut the slice - fill a tall glass with hot water, dip knife in water for a few seconds, and wipe dry with a clean tea towel.


From A table for two

Happy Canada Day!